
If you're looking for a way to strengthen your glutes, the flat bench hip thrust is a great exercise to consider. This exercise is perfect for anyone, whether you're a beginner or an experienced lifter. In this article, we'll cover everything you need to know about the flat bench hip thrust, including how to perform it correctly, the benefits of the exercise, and more.
What is the Flat Bench Hip Thrust?

The flat bench hip thrust is an exercise that targets the glutes and hamstrings. It's similar to the traditional hip thrust, but it's performed on a flat bench instead of a raised platform. This exercise involves lying on your back on a flat bench with your knees bent and your feet flat on the ground. You then lift your hips off the bench, squeezing your glutes as you do so.
How to Perform the Flat Bench Hip Thrust

To perform the flat bench hip thrust:
- Start by sitting on the floor in front of a flat bench. Place a barbell across your hips, making sure it's secure and stable.
- Lean back against the bench and position your shoulder blades on the edge of the bench.
- Bend your knees and place your feet flat on the ground, about hip-width apart.
- Engage your core and glutes and lift your hips off the ground, keeping your feet planted on the floor.
- Pause at the top of the movement and squeeze your glutes before slowly lowering your hips back down to the ground.
- Repeat for the desired number of reps.
Benefits of the Flat Bench Hip Thrust

The flat bench hip thrust is a great exercise for anyone looking to build stronger glutes and hamstrings. Here are some of the benefits of the exercise:
- Targets the glutes: The hip thrust is one of the most effective exercises for building strong, toned glutes.
- Improves hip extension: By working the glutes and hamstrings, the hip thrust can help improve hip extension and overall lower body strength.
- Reduces lower back pain: The hip thrust can help strengthen the glutes and hamstrings, which can help alleviate lower back pain.
- Increases power: Strong glutes and hamstrings are essential for explosive movements like jumping and sprinting.
Common Mistakes to Avoid

Here are some common mistakes to avoid when performing the flat bench hip thrust:
- Not using proper form: Make sure to keep your feet planted on the ground and lift your hips using your glutes, not your lower back.
- Using too much weight: Start with a lighter weight and focus on proper form before increasing the weight.
- Not engaging your core: Make sure to engage your core throughout the movement to avoid putting too much strain on your lower back.
Conclusion
The flat bench hip thrust is a great exercise for anyone looking to build stronger glutes and hamstrings. By using proper form and avoiding common mistakes, you can get the most out of this exercise and see great results. Incorporate the flat bench hip thrust into your lower body workout routine and watch your glutes and hamstrings get stronger than ever before!
Related video of Flat Bench Hip Thrust: The Ultimate Guide

Are you looking to improve your strength and tone your back and shoulder muscles? If yes, then you should definitely try the bent over dumbbell swings. This exercise is perfect for anyone who wants to develop a stronger and more muscular upper body. In this article, we will guide you through the proper form and technique for performing bent over dumbbell swings.
What are Bent Over Dumbbell Swings?

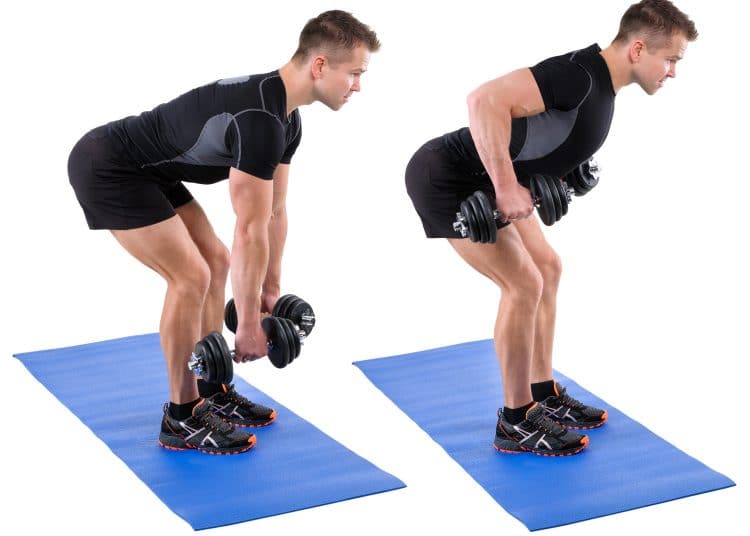
Bent over dumbbell swings are a weight training exercise that primarily targets your back and shoulder muscles. This exercise requires you to bend over and swing the dumbbells back and forth, using the momentum of the movement to lift the weights. This exercise is great for improving your strength, muscle mass, and tone in your upper body.
How to Perform Bent Over Dumbbell Swings

To perform bent over dumbbell swings, follow these steps:
- Stand with your feet shoulder-width apart and a dumbbell in each hand.
- Bend at the waist until your torso is parallel to the floor.
- Let your arms hang straight down with the dumbbells in your hands.
- Using the momentum of the movement, swing the dumbbells back and forth in a controlled motion.
- Keep your elbows straight and your back flat throughout the exercise.
- Do 3 sets of 10-12 reps, resting for 30-60 seconds between sets.
Common Mistakes to Avoid

While performing bent over dumbbell swings, it's important to avoid these common mistakes:
- Not keeping your back flat throughout the exercise
- Using too much momentum to lift the weights
- Letting your elbows bend during the movement
- Not controlling the weights as they swing back and forth
- Using weights that are too heavy
Benefits of Bent Over Dumbbell Swings
Bent over dumbbell swings offer many benefits, including:
- Improved strength and muscle mass in your back and shoulder muscles
- Toning and shaping of your upper body
- Improved posture and balance
- Increased range of motion in your shoulder joints
- Reduced risk of injury to your upper body
Variations of Bent Over Dumbbell Swings

If you want to add variety to your workout routine, you can try these variations of bent over dumbbell swings:
- Single-arm bent over dumbbell swings
- Alternating bent over dumbbell swings
- Bent over barbell rows
- Bent over kettlebell swings
Conclusion
Bent over dumbbell swings are a great exercise for improving your strength and muscle mass in your back and shoulder muscles. By following the proper form and technique, you can achieve great results and avoid injury. So, add this exercise to your workout routine and see the difference it makes!
Related video of Bent Over Dumbbell Swings: A Comprehensive Guide

Shoulder workouts are important for maintaining a healthy and strong upper body. While there are many exercises that can be performed with different equipment, the one dumbbell workout is a great option for those who have limited access to equipment or want to switch up their routine. In this article, we will discuss the benefits and proper technique for performing a shoulder one dumbbell workout.
Benefits of Shoulder One Dumbbell Workout

One of the main benefits of the shoulder one dumbbell workout is that it can be performed anywhere, making it a great option for those who don't have access to a gym or prefer to workout at home. Additionally, using one dumbbell instead of two can help to improve balance and stability, as it requires more control over the weight.
Another benefit of this workout is that it targets multiple muscle groups in the shoulders, including the anterior, medial, and posterior deltoids. This can help to improve overall shoulder strength and stability, which can be beneficial for sports performance and everyday activities.
Proper Technique for Shoulder One Dumbbell Workout

Before starting any workout, it is important to warm up properly to prevent injury. For the shoulder one dumbbell workout, some good warm up exercises include arm circles, shoulder rolls, and thoracic spine mobility exercises.
To perform the shoulder one dumbbell workout, start by standing with your feet shoulder-width apart and holding the dumbbell in your right hand. Bring your right arm up and out to the side until it is parallel to the ground, keeping your elbow slightly bent. Slowly lower the weight back down and repeat for 8-12 reps before switching to the left arm.
It is important to maintain proper form throughout the exercise, keeping your core engaged and your shoulders down and back. Avoid swinging the weight or using momentum to lift it, as this can lead to injury and reduce the effectiveness of the exercise.
Variations of Shoulder One Dumbbell Workout

There are many variations of the shoulder one dumbbell workout that can be performed to target different areas of the shoulders and add variety to your routine. Some variations include:
- Front Raises: Hold the dumbbell with both hands in front of your thighs and lift it straight up to shoulder level.
- Bent-Over Lateral Raises: Bend forward at the waist and lift the weight out to the side, targeting the posterior deltoids.
- Arnold Press: Start with the dumbbell in front of your chest, rotate it out to the side, and then press it overhead.
Conclusion
The shoulder one dumbbell workout is a great option for those who want to improve their shoulder strength and stability without needing a lot of equipment. By performing this exercise with proper form and adding variations to your routine, you can target multiple areas of the shoulders and see improvements in your overall upper body strength.
Related video of Shoulder One Dumbbell Workout

Dumbbell kickbacks are a popular exercise for building the triceps muscles. This exercise is easy to do and requires only a pair of dumbbells. It is an isolation exercise that targets the triceps muscles specifically. If you are interested in building your triceps muscles, then the dumbbell kickback is an exercise that you should include in your workout routine. In this article, we will discuss the muscles worked during dumbbell kickbacks.
Triceps Brachii

The triceps brachii is the primary muscle worked during dumbbell kickbacks. This muscle is located at the back of the upper arm and is responsible for extending the elbow joint. The triceps brachii is made up of three heads: the long head, medial head, and lateral head. The long head is the largest of the three heads and is the most active during dumbbell kickbacks.
Rhomboids

The rhomboids are a group of muscles located in the upper back. These muscles are responsible for retracting the scapula, which is important for maintaining proper posture. During dumbbell kickbacks, the rhomboids are used to stabilize the scapula and keep it in place. This helps to prevent injury and ensures that the triceps muscles are worked effectively.
Posterior Deltoid

The posterior deltoid is located at the back of the shoulder and is responsible for shoulder extension and external rotation. During dumbbell kickbacks, the posterior deltoid is used to help stabilize the shoulder joint and prevent injury. While the posterior deltoid is not the primary muscle worked during this exercise, it is still important for maintaining proper form and preventing injury.
Biceps Brachii

The biceps brachii is located at the front of the upper arm and is responsible for flexing the elbow joint. Although the biceps brachii is not directly worked during dumbbell kickbacks, it is still used to stabilize the arm and prevent injury. This muscle also helps to maintain proper form during the exercise.
Forearm Muscles

The muscles of the forearm are also worked during dumbbell kickbacks. These muscles are responsible for wrist extension and stabilization. During the exercise, the forearm muscles are used to keep the wrist straight and stable, which helps to prevent injury and ensures that the triceps muscles are worked effectively.
Conclusion
Dumbbell kickbacks are an effective exercise for building the triceps muscles. This exercise primarily works the triceps brachii, but it also works a number of other muscles, including the rhomboids, posterior deltoid, biceps brachii, and forearm muscles. By including dumbbell kickbacks in your workout routine, you can build strong, defined triceps muscles and improve your overall upper body strength.
Related video of Dumbbell Kickbacks Muscles Worked
:max_bytes(150000):strip_icc()/106750694-56a8f3c75f9b58b7d0f6ab04.JPG)
Plank with Swiss Ball is a great exercise that targets your core muscles. It is a variation of the traditional plank exercise that adds an element of instability, making it more challenging and effective. This exercise requires a Swiss ball, which is a large inflatable ball used for various fitness activities. In this article, we will discuss the benefits of Plank with Swiss Ball, how to perform it correctly, and some variations to try.
Benefits of Plank with Swiss Ball
Plank with Swiss Ball is an excellent exercise for strengthening your core muscles, including your abs, lower back, and hips. This exercise also improves your balance, stability, and posture. By adding an unstable surface, your body has to work harder to maintain proper form and alignment, which results in increased muscle activation and calorie burn.

Furthermore, Plank with Swiss Ball is a low-impact exercise that is suitable for people of all fitness levels. It can be modified to make it easier or more challenging, depending on your needs and abilities.
How to Perform Plank with Swiss Ball
Here are the steps to perform Plank with Swiss Ball:
- Place the Swiss ball on the floor and assume a plank position with your forearms on the ball and your toes on the ground.
- Engage your core muscles and maintain a straight line from your head to your heels.
- Hold the position for 30-60 seconds, or as long as you can maintain proper form.
- Release and rest for 30 seconds before repeating.

Make sure to keep your shoulders relaxed and away from your ears, and avoid arching or sagging your back. You can also try different variations, such as lifting one leg or arm off the ground, or rolling the ball forward and backward.
Precautions and Tips
Plank with Swiss Ball is generally safe for most people, but there are some precautions and tips to keep in mind:
- If you have any back or shoulder injuries, consult with your doctor or physical therapist before attempting this exercise.
- Start with a shorter hold time and gradually increase as you get stronger and more comfortable.
- Avoid holding your breath and remember to breathe deeply and evenly throughout the exercise.
- If you feel any pain or discomfort, stop immediately and rest.

Conclusion
Plank with Swiss Ball is a challenging and effective exercise that can help you strengthen your core muscles, improve your balance and stability, and enhance your overall fitness level. By following the proper form and precautions, you can safely perform this exercise and reap its benefits. So, grab a Swiss ball, and give it a try!
Related video of Plank with Swiss Ball
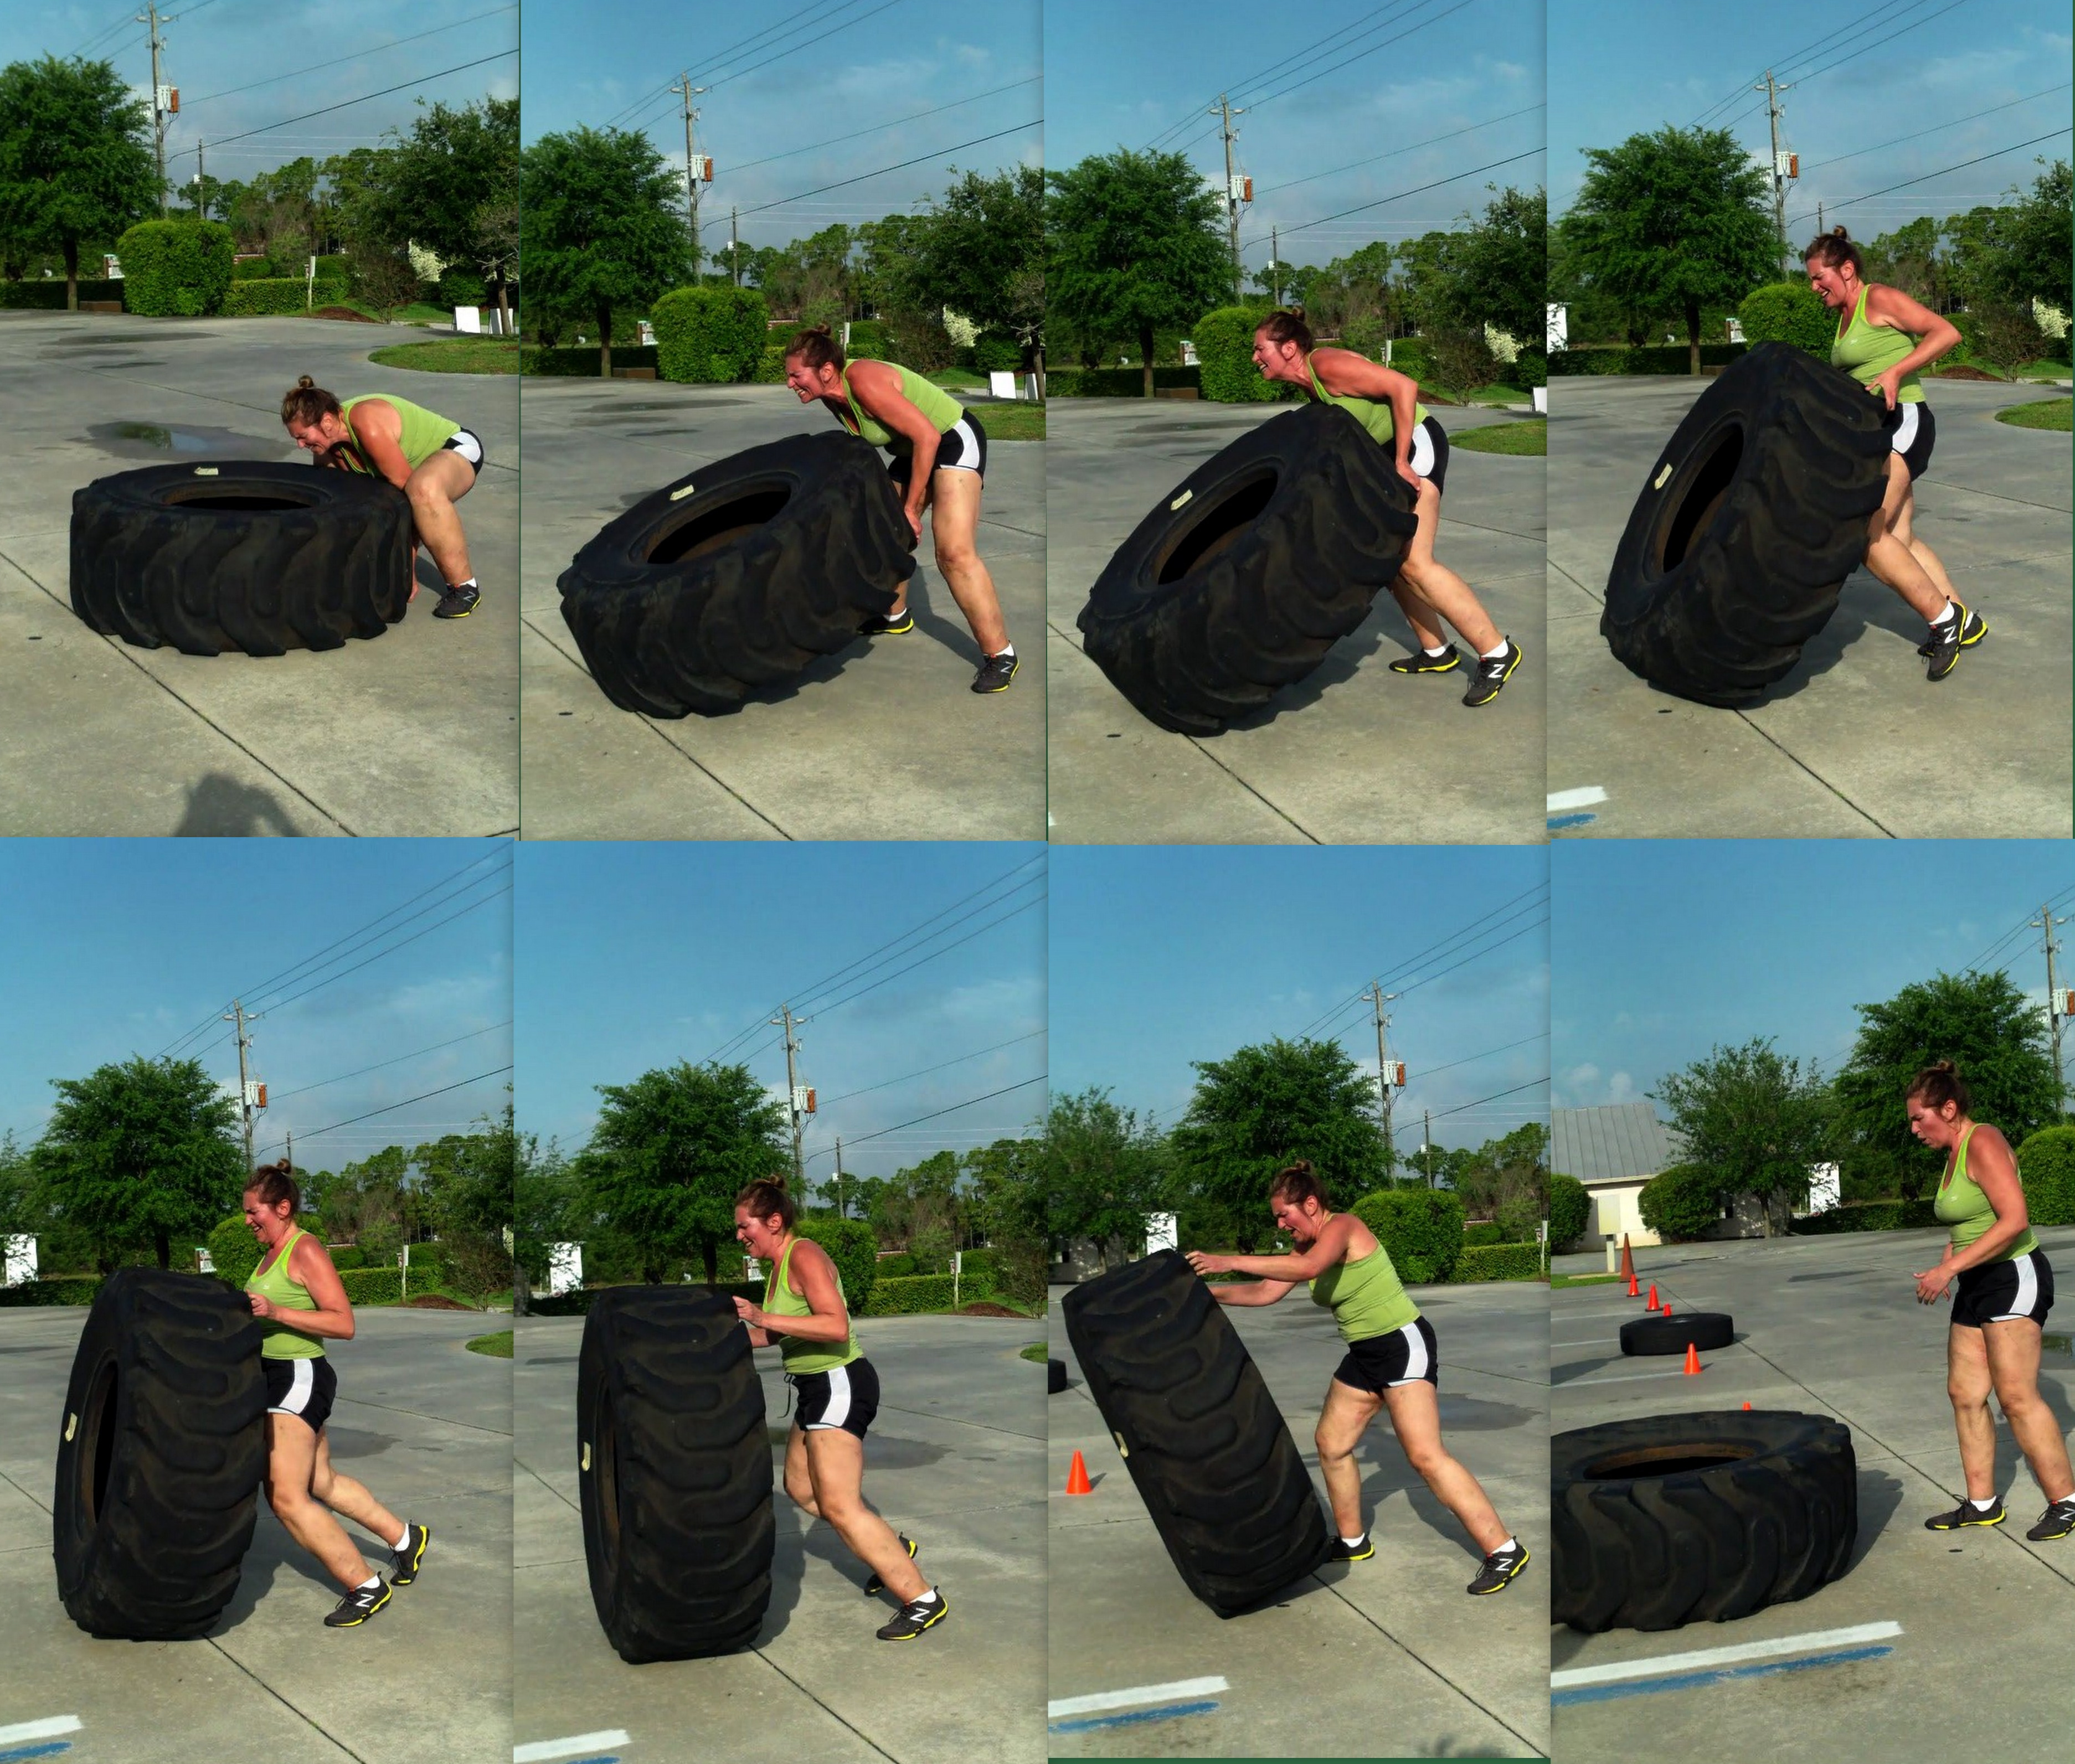
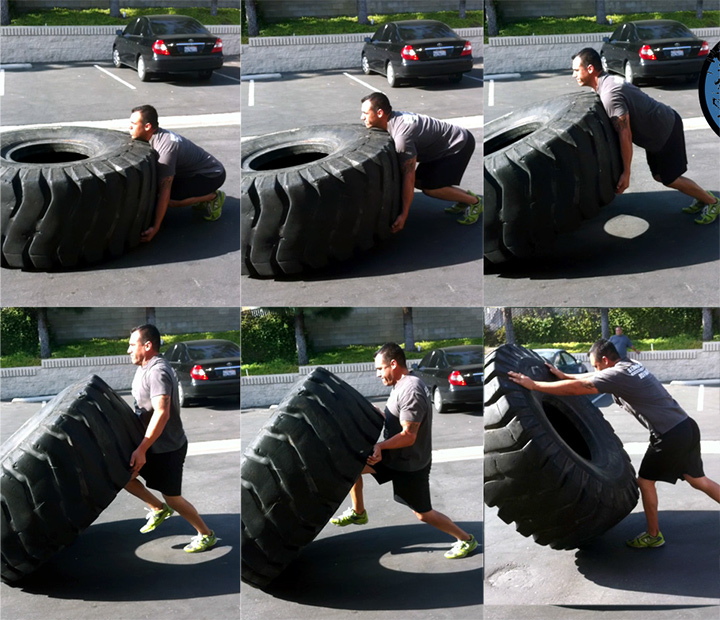
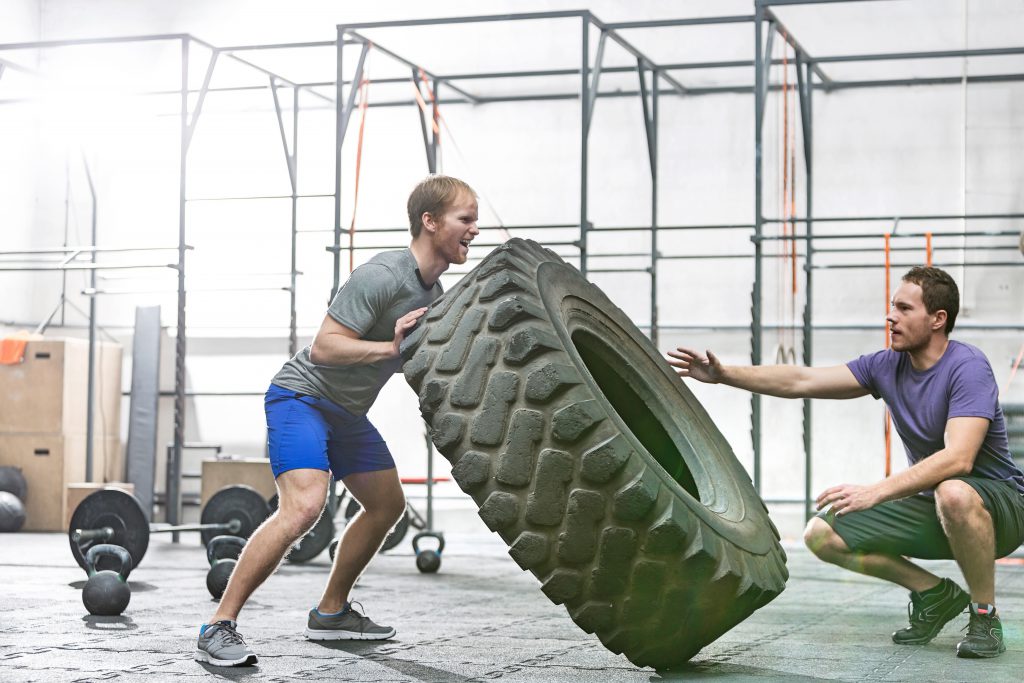
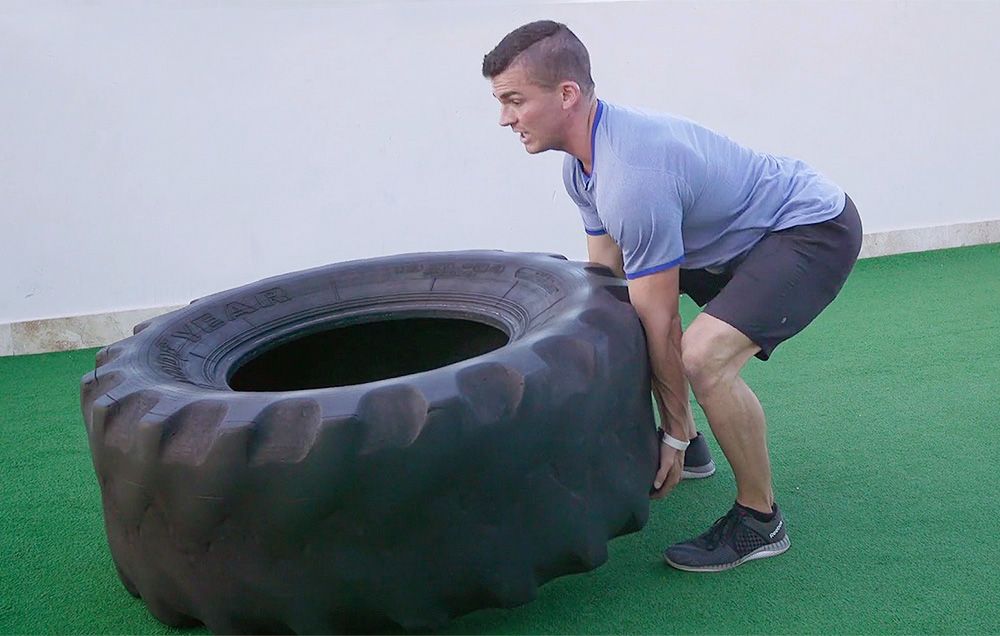
If you're looking for a new exercise to add to your workout routine, you might want to consider tire flips. This exercise involves flipping a large tire over repeatedly, and it's become a popular choice among athletes and fitness enthusiasts alike. But what exactly do tire flips work? Let's take a closer look.
The Muscles Involved
One of the biggest benefits of tire flips is that they work a wide range of muscles throughout your body. The primary muscles targeted by this exercise include your quadriceps, hamstrings, glutes, and calves. Additionally, tire flips also work your core muscles, including your abs, obliques, and lower back. This makes it a great full-body workout that can help you build strength and endurance.
Cardiovascular Benefits
In addition to the muscular benefits, tire flips also provide a great cardiovascular workout. This is because they require a lot of explosive power and effort, which can help you improve your overall conditioning and endurance. By incorporating tire flips into your workout routine, you can improve your cardiovascular health and increase your overall fitness levels.
Functional Strength
Another benefit of tire flips is that they help you develop functional strength. This means that you'll be better equipped to handle real-life physical challenges, such as moving furniture or carrying heavy loads. By building functional strength through tire flips, you can improve your overall quality of life and reduce your risk of injury in everyday activities.
How to Do Tire Flips
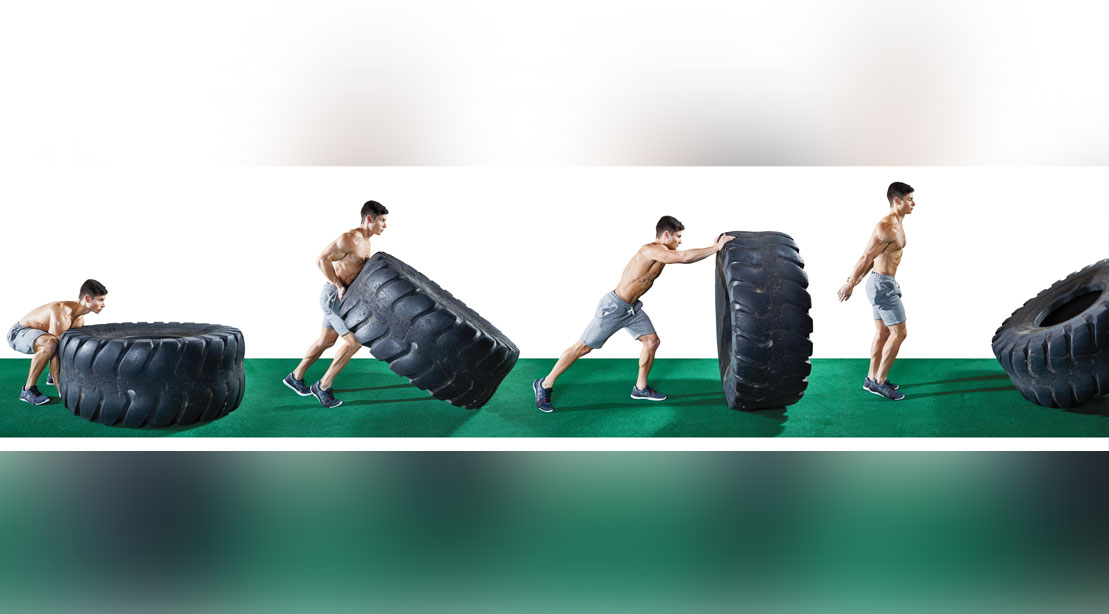
If you're interested in trying tire flips for yourself, here's how to do them:
- Start by standing behind the tire with your feet shoulder-width apart.
- Lower your hips and grab the bottom of the tire with both hands.
- Drive your hips forward and lift the tire off the ground.
- Flip the tire over onto its opposite side by driving your hips forward and extending your legs.
- Repeat for a desired number of reps.
It's important to maintain proper form throughout the exercise to avoid injury. Be sure to keep your back straight and your core engaged, and don't let your knees collapse inward.
In Conclusion
Tire flips are an excellent exercise for anyone looking to build full-body strength, improve cardiovascular health, and develop functional strength. By incorporating tire flips into your workout routine, you can challenge yourself in new ways and achieve your fitness goals.
Related video of What Do Tire Flips Work?
Hamstrings are the muscles located at the back of your thighs. They are essential for hip extension, knee flexion, and lower body stability. Tight hamstrings can lead to a variety of problems, including lower back pain and knee injuries. Foam rolling is an effective way to release tension in your hamstrings and improve your flexibility. Here's how to foam roll your hamstrings:
1. Get a Foam Roller
The first step is to get a foam roller. Foam rollers come in different lengths, densities, and shapes. For hamstrings, a longer roller is better, as it allows you to target the entire muscle. A denser roller will provide a deeper massage, but it may be too intense for beginners. Choose a roller that suits your needs and preferences.
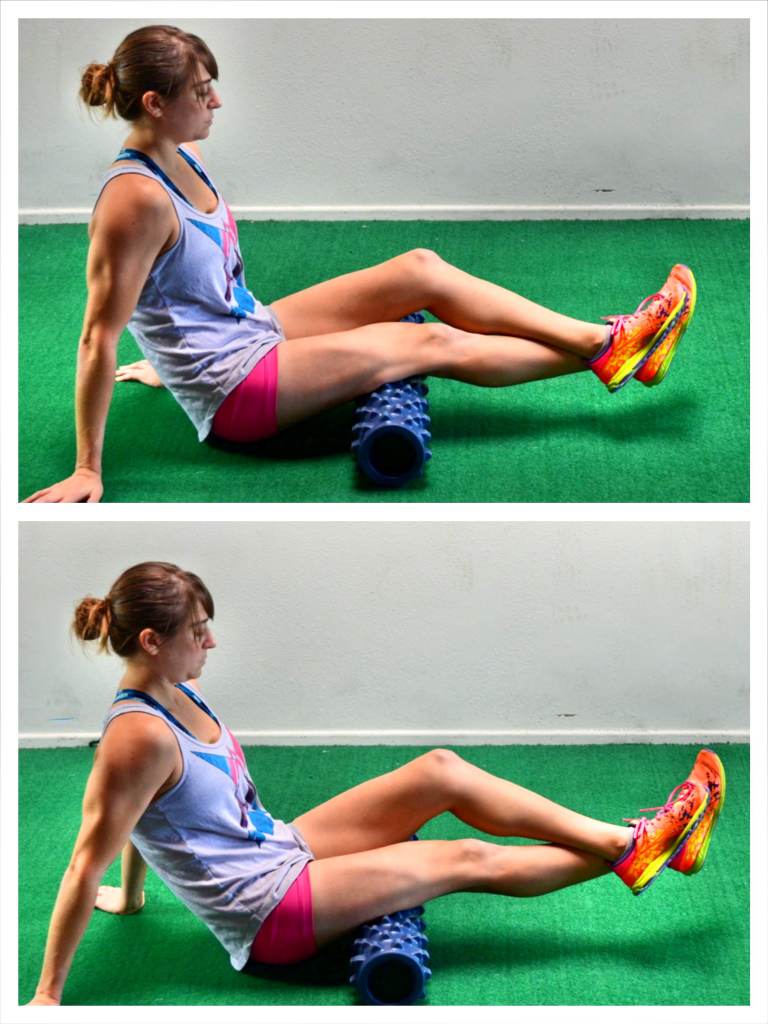
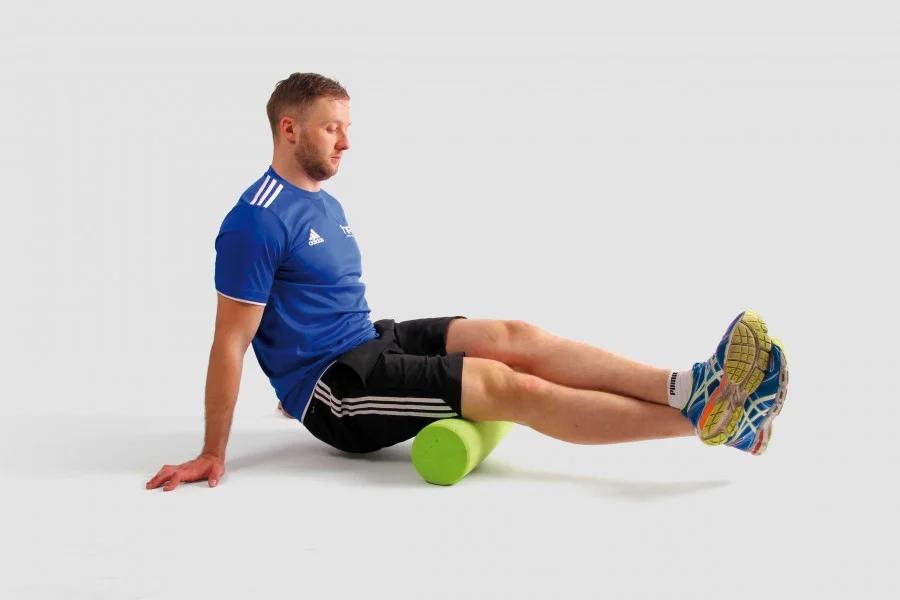
2. Find a Comfortable Position

Once you have your foam roller, find a comfortable position. Sit on the floor with your legs straight in front of you and the foam roller under your thighs. Place your hands on the floor behind you for support. This is your starting position.
3. Roll Back and Forth

Start rolling back and forth, moving the roller from your knees to your glutes. Use your hands to control the movement and pressure. Roll slowly and focus on the areas that feel tight or tender. Spend at least 30 seconds on each spot before moving on.
4. Cross One Leg Over the Other
To target the outer part of your hamstrings, cross one leg over the other. Place the foam roller under the outer thigh of the crossed leg and roll back and forth. You may feel a deeper stretch and pressure on this side.
5. Switch Legs

After rolling one leg, switch to the other side. Repeat the same steps, starting with the comfortable position and then rolling back and forth. Cross the opposite leg over for the outer part of your hamstrings.
6. Use Your Bodyweight

To increase the pressure and intensity of the massage, use your bodyweight. Lift your glutes off the floor and place more weight on the foam roller. This will help you reach deeper layers of muscle tissue and release more tension.
7. Don't Roll Over the Knee Joint

Be careful not to roll over your knee joint. This can cause discomfort and even injury. Keep the foam roller above your knee and focus on the upper part of your hamstrings.
8. Breathe and Relax

While foam rolling, remember to breathe deeply and relax your muscles. Avoid tensing up or holding your breath. This will help you release tension and improve your flexibility.
9. Do It Regularly

Foam rolling your hamstrings should be done regularly for best results. Aim for at least two to three times per week, or more if you have tight hamstrings. Consistency is key when it comes to improving your flexibility and reducing muscle tension.
10. Stretch Afterwards

After foam rolling, it's important to stretch your hamstrings. This will help you maintain the flexibility and prevent muscle soreness. You can do simple stretches such as seated forward fold or standing hamstring stretch.
Conclusion
Foam rolling your hamstrings is a simple and effective way to release tension and improve your flexibility. Follow these steps regularly and you'll notice a significant improvement in your lower body mobility and stability. Remember to choose a foam roller that suits your needs and preferences, and to breathe deeply and relax your muscles while rolling.
Related video of How to Foam Roll Hamstrings

When it comes to building the upper body, most people tend to focus on typical exercises such as bench presses, bicep curls, and push-ups. While these are certainly effective in developing strength and size, they tend to neglect some of the smaller, stabilizing muscles of the upper back and shoulders. This is where seated cable face pulls come in.
What Are Seated Cable Face Pulls?

Seated cable face pulls are an exercise that targets the rear deltoids, upper back, and rotator cuff muscles. It involves sitting on a bench with a cable machine in front of you, grabbing the cable attachment with both hands, and pulling it towards your face while keeping your elbows high and wide.
How to Do Seated Cable Face Pulls

Here are the steps to perform seated cable face pulls:
- Attach a rope or handle to a cable machine at chest height.
- Sit on a bench facing the machine and grab the rope or handle with both hands.
- Keeping your elbows high and wide, pull the rope towards your face while squeezing your shoulder blades together.
- Pause briefly at the end of the movement, then slowly return to the starting position.
- Repeat for the desired number of reps and sets.
Benefits of Seated Cable Face Pulls

Seated cable face pulls offer several benefits, including:
- Improved upper back and shoulder posture
- Increased strength and size of the rear deltoids
- Better shoulder stability and injury prevention
- Improved performance in other upper body exercises
- Reduced risk of shoulder impingement
Variations of Seated Cable Face Pulls

There are several variations of seated cable face pulls that you can try, such as:
- Using a rope or handle attachment
- Performing the exercise standing up
- Using different hand positions
- Performing the exercise with one arm at a time
Precautions and Tips

Here are some precautions and tips to keep in mind when performing seated cable face pulls:
- Start with a light weight and focus on proper form before increasing the weight.
- Keep your elbows high and wide throughout the movement to target the rear deltoids.
- Avoid pulling the rope too close to your face to prevent neck strain.
- Don't use momentum to complete the movement - focus on a slow and controlled motion.
- Take a break if you experience any pain or discomfort.
Conclusion
Seated cable face pulls are a highly effective exercise for developing the upper back and shoulder muscles that are often neglected in traditional upper body workouts. By incorporating this exercise into your routine, you can improve your posture, reduce your risk of injury, and enhance your overall upper body strength and size.
Related video of Seated Cable Face Pulls: A Must-Try Exercise for Upper Body Development

Side leg lifts are a popular exercise among fitness enthusiasts and for good reason. This simple yet effective exercise targets the outer thighs, glutes, and hips, helping to tone and sculpt these areas for a more defined and shapely figure. But just how effective are side leg lifts, and what kind of results can you expect to see?
The Basics of Side Leg Lifts

Before we dive into the before and after results of side leg lifts, let's first go over the basics of the exercise. To perform a side leg lift, simply lie on your side with your legs stacked on top of each other. Prop yourself up on your elbow and raise your top leg as high as you can, then lower it back down. Repeat for several reps before switching to the other side.
There are a few variations of side leg lifts you can try, such as adding ankle weights or using a resistance band to increase the difficulty of the exercise. But even without any added resistance, side leg lifts can be an effective way to tone and strengthen your lower body.
Before and After Results of Side Leg Lifts

So, what kind of results can you expect to see from doing side leg lifts? Of course, everyone's body is different, and the results will vary based on factors like your current fitness level, diet, and other lifestyle habits. However, in general, you can expect to see the following benefits:
- More toned and defined outer thighs
- Stronger glutes and hips
- Better balance and stability
- Improved posture
- Increased flexibility in the hips and legs
Many people also find that doing side leg lifts regularly can help reduce the appearance of cellulite in the outer thighs and buttocks, which can be a major motivator for those looking to achieve a smoother, more toned look.
Tips for Getting the Most Out of Your Side Leg Lifts

If you're looking to maximize your results from side leg lifts, here are a few tips to keep in mind:
- Focus on proper form. It's better to do a few reps with correct form than many reps with poor form, as this can lead to injury and reduced effectiveness of the exercise.
- Try different variations to keep things interesting and challenge your muscles in new ways.
- Incorporate side leg lifts into a well-rounded fitness routine that includes cardio, strength training, and stretching for optimal results.
- Be patient and consistent. Like with any exercise, it may take some time to see noticeable results, so don't get discouraged and keep at it!
Conclusion
Overall, side leg lifts are an excellent exercise for toning and sculpting the lower body, and can be a great addition to any fitness routine. By incorporating this exercise into your workouts and following the tips outlined above, you can expect to see some impressive before and after results that will leave you feeling stronger, more confident, and more satisfied with your body.